
Valentine’s Day is the perfect time to get creative with kids, and what better way to combine art and sensory play than with marbled paper hearts? This simple craft from Rachel’s Young at Art uses shaving cream and a few colorful ingredients to create mesmerizing patterns that can be turned into cards, garlands, or keepsakes. The best part? No two designs are ever the same!
Have older kids at home? Keep reading to find out how to transform your marbled hearts into beaded love catchers!
Why We Love This Craft
Marbled paper hearts are an exciting, hands-on activity that’s as fun to create as it is beautiful to admire. The process involves swirling vibrant colors into fluffy shaving cream, pressing paper into the design, and revealing stunning marbled patterns. This craft encourages kids to explore color mixing, textures, and creative experimentation while making heartfelt Valentine’s decorations.
What You’ll Need
To get started, gather the following materials:
- Shaving cream: The foam variety (not gel) works best.
- Liquid food coloring or liquid watercolors: Choose colors that complement each other.
- White cardstock or watercolor paper: Thick paper holds up best to this process.
- A large tray or shallow dish: Big enough to fit your paper.
- Plastic spatula or scraper: An old credit card works, too.
- Wooden skewers, toothpicks, or forks: For swirling the colors.
- Heart templates and scissors: To cut out heart shapes.
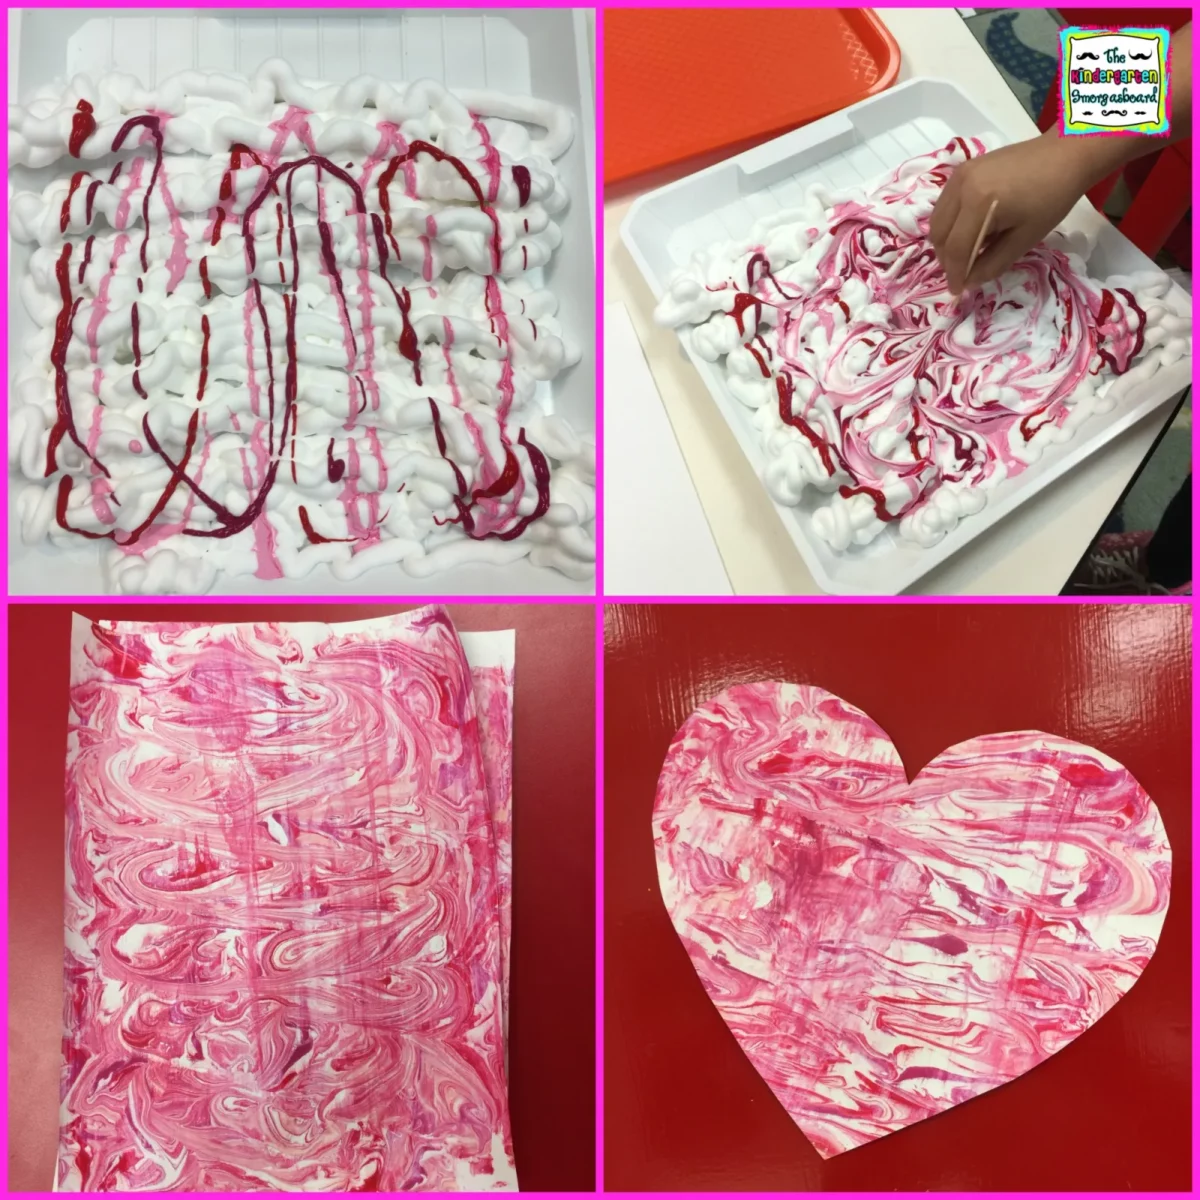
How to Make Marbled Paper Hearts
1. Prepare the Shaving Cream Base
Start by spraying a generous layer of shaving cream into the tray. Spread it out evenly with a spatula to create a smooth surface.
2. Add the Colors
Add small drops of food coloring or liquid watercolors directly onto the shaving cream. Stick to 2–4 colors for the best results—too many can make the colors blend into a muddy mess.
3. Swirl the Magic
Using a skewer, toothpick, or fork, gently swirl the colors together. Experiment with different patterns, such as zigzags, spirals, or random swirls. Encourage kids to be creative—there’s no wrong way to do this!
4. Press the Paper
Place a piece of cardstock or watercolor paper onto the shaving cream, pressing lightly to ensure the entire surface makes contact with the colors. Let it sit for a few seconds.
5. Reveal the Design
Lift the paper off the shaving cream and lay it flat on a clean surface. Use the spatula to scrape off the excess shaving cream, revealing the beautiful marbled design underneath.
6. Let It Dry
Allow the paper to dry completely. Once dry, the colors will look even more vibrant!
7. Cut Out the Hearts
Use scissors or heart-shaped templates to cut hearts from the marbled paper.
Tips for Success
Keep It Simple: Less is more when it comes to swirling. Overmixing can muddy the colors.
Experiment: Try different tools for swirling, like combs or spatulas, to create unique patterns.
Make It a Science Lesson: Talk about how colors mix and the texture of the shaving cream.
Bonus: Turning Your Marbled Heart Into A Love Catcher
Cut small slits along the sides about an inch apart.
Take yarn or string and wrap it around the hearts. Make sure you’re sliding the string into each slit.
Punch three holes at the base of the heart and one at the top of the heart.
String three strands of beads and tie each through the holes at the bottom of the heart so that the strands are dangling down.
Tie a ribbon through the hole at the top of the heart so that it can be hung up.
Hang your love catcher by your bed and have sweet dreams!
Wrap-Up
Marbled paper hearts are a fantastic way to bring creativity and fun into your Valentine’s Day celebrations. Whether you’re crafting at home, in a classroom, or at a playgroup, this project will leave kids with lasting memories and beautiful creations. So grab some shaving cream and let the marbling magic begin!
Visit www.rachelsyoungatart.com for Valentine’s Kids’ Night Out, President’s Day Camp, Spring Break Camps, and more!
Need more craft ideas? Check this one out!


